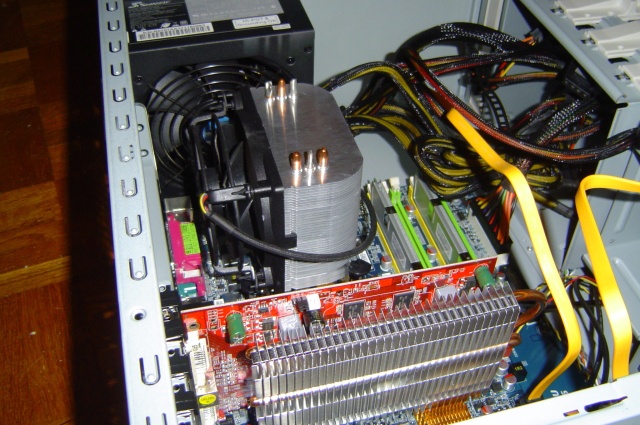
For my new computer I bought a ATI HD 2600 PRO with a bunch of memory. This card has some really good 3D results, and works well on Linux. But I run into some issues with de xv extension on this board. In fact the driver (the free or binary one) doesn’t seems to support sync on vblank. So when a app try do display datas on the screen, some image destructions appear. This mainly occurs when I’m watching videos but in 3D games too. This is a really stupid bug or mis-feature. How can a serious video programmer can do that ?
After a couple of month, I decided it was enough, I was sick of this dirty stripes on screen. I tested every ATI driver one after one … (ATI opensource drivers have too bad performances to be used on a every days desktop, could you live without google-earth ? ) .. so I decided to go to other side, and bought a Nvidia 8600GT from ASUS. This card perform quite as the ATI in 3D, and have a affordable price. So I switched from ATI to Nvidia.
ATI offers better opensource support, but Nvidia binary driver is really nice to use and have better support today from stuffs like Compiz and Co.. and NO MORE STRIPES !! :)
A couple of weeks ago, I upgraded my Ubuntu Gusty to Hardy. Everything was Ok, since I played with firefox. Some heavy loaded pages (like Amazon, or Gmail) was damn sloowwwww ! Playing with scroll was a source …… grrrrrr ….Firefox on Hardy is 3.0b5. This version has a major “feature” the use a Xrender for the page display. And this looks like Xrender is dawn slow on Nvidia cards .. In fact, Nvidia has already work on this kind of issue before. Without looking forward I decided to run a little benchmark, with the help of friends with Xrenderbenchmark. So here the results.
Benchmarks
Benchmarks was done by me and 2 firends, on Q6600 or E6600 Intel CPU running at 2.4Gh, with kernel 2.6.24.1. The graphs only show the Plain results (not Plains + Alpha, or Transformation) but the results are quite the same anyways.
Legend:
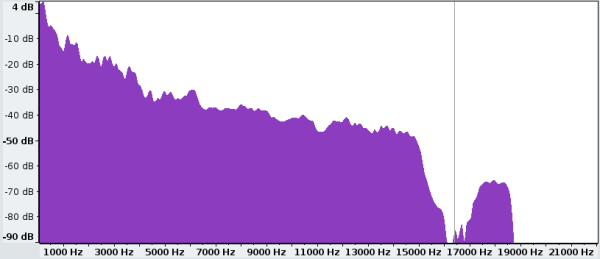
- 8600GT/nv : Nividia 8600GT / Xorg 1.4.1git 32 bits / Nvidia GPL driver
- 8600GT/nvidia : Nividia 8600GT / Xorg 1.4.1git 32 bits / Nvidia binary driver ver: 169.12
- 8600GT/nividia-64 : Nvidia 8600GT / Xorg 1.4.1git 64 bits / Nvidia binary driver ver: 169.12
- Intel GMA X300 : Intel GMA 3000 / Xorg 1.4.0.9 64 bits / Intel GPL driver
- ATI HD2600PRO : ATI HD 2600 Pro / Xorg 1.4.1git 64 bits / ATI GPL driver
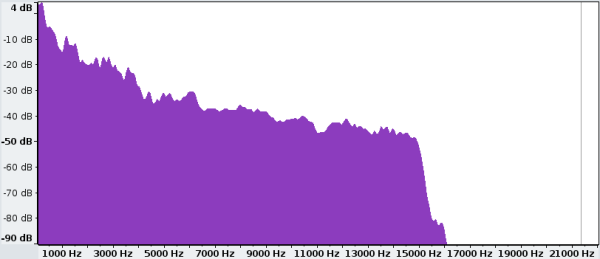
I split the results into two graphs for convenience.
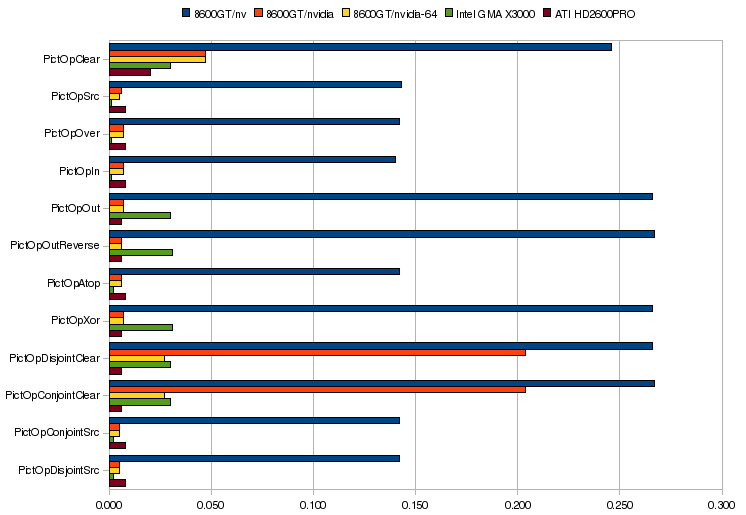
As you can see on this first part, numbers are really small, the Nvidia GPL driver is the worst : 5 times slower than any other one. Not a good news, and the binary one have some bad results on 2 tests. ATI HD and Nvidia drivers offer quite the same results, but remenber this is the GPL ATI driver ! … The Intel doesn’t have a lot of linearity on this part.
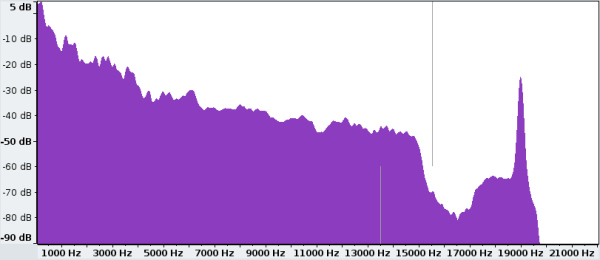
But the next graph give us absolutely different picture !
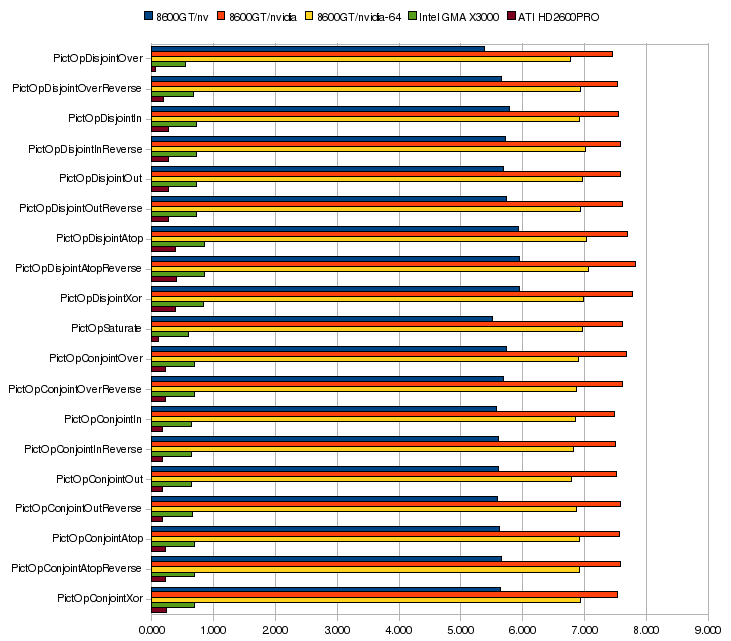
For every graph, Nvidia drivers (GPL, or binary, 32 or 64 bits) are at least 6 time slower. Intel perform very well, no surprise, this card are damn cool, perfect driver for linux.. but to slow in 3D to really rock. And ATI GPL driver is the clear winner of this benchmarks tests.
As my issue is the Nvidia one, I can comment the results, the GPL driver performs better than the binary one. This is not a big surprise cause, I can see it in Firefox, even it’s slow. There is difference between 64 bits and 32, but I guess this is more kernel related than the driver itself.
I’m not a video guru and only do that figure out what’s going on my computer. I publish in the hope it might help somebody else, and to find help.
Update : The numbers can be found here
Thanks to Ludo and Christian for their help !
Important update : Check the new driver results !!